SECTIONS BEFORE THIS

Quickstart -- rename to Intro, remove pages vs sites.
A Quickstart for Total Beginners
If you don’t know the first thing about how webpages are made, we’ll get you up to speed here.
If you have even a little bit of experience building web pages, you may want to skip past the basics and read about the specifics of using elements on Hot Page.
HTML - the basic stuff of the web
HTML, which stands for HyperText Markup Language, is the basic stuff of the web. Of course, there’s loads of other programming languages used on the internet, but HTML is the language of web browsers. So, no matter what crazy stuff you’re doing with Python or databases, you’re probably sticking it in HTML before you send it to your users. HTML is called a markup language because it’s basically a text format, with some code mixed in to “mark it up”— to change the way it looks. Here’s a really simple example:
The <strong>Queen of Hearts</strong>, she made some tarts
Here we’ve marked up Queen of Hearts with <strong> “tags”, to make it bold. The tags are the bits in
angle brackets. When the browser renders the page, you don’t see the tags, you only see that the text is
bold. Tags often come in pairs like this— an “opening tag” and a “closing tag,” with some stuff in
between. The tags are sort of like a container, affecting only the stuff they contain. The whole container including its
contents is called an “element”.
On a web page, pretty much everything is an “element.” This paragraph, the menu at the top of the window, the links in the menu—these are all elements. And in most cases, you’ve got elements nested inside of other elements, like this:
<p>The <strong>Queen of Hearts</strong>, she made some tarts</p>
Here, we have an example of a paragraph made with the <p> tag, just like the one you’re reading now.
Inside of that, “Queen of Hearts” is still bold. Even a very simple web page is a complex hierarchy of elements inside
of other elements.
Some tags don’t come in pairs, because they can’t contain text or other elements. For example, you can put text inside of a paragraph but not inside of an image.
<img src="cat.gif" class="thumbnail">
Images can’t contain other stuff besides the image—so <img> tags just use a src
“attribute” to tell the browser where to find the appropriate cat photo. Some tags, like <img>, come
with essential built-in attributes, but all tags can have any number of optional attributes as well. Attributes can tell
the browser to do all kinds of different things, and they’re especially useful for styling elements. Elements come with
basic presentation defaults— like how links are underlined and headings are shown in bigger text. But if we want more
control, we need to use CSS styles.
Cascading Style Sheets - How we make it look cool
If HTML defines the basic structure of your page content, CSS is how you make it look awesome. CSS is short for Cascading Style Sheets. Thank God it’s one of those acronyms that is never really spelled out and many people who use this language every day may not even know what it actually stands for.
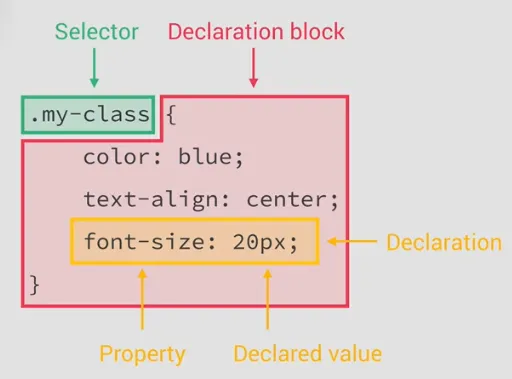
CSS is made up of “rules” that look like this:
img.thumbnail {
  width: 600px;
  height: 400px;
  border-color: pink;
}
A CSS rule has these parts:
- Selector: This identifies which elements to apply the rule to. Selectors attach CSS styles to HTML elements.
-
Declaration Block: Contains one or more property-value pairs enclosed in curly braces
{}. Each declaration is aproperty:valuepair. -
Property: Which part of the thing we’d like to style. Different elements have different properties. For
example, an image can have a
border-colorbut not afont-style. -
Value: the setting we’d like to use. Different properties accept different values. For example, a
border-colorcan bepink, but not400px.
There are lots of properties to know, but you’ll learn them quickly. After that, you’ll find yourself using the same stuff over and over again. Selectors, however, are the really powerful part of CSS, so pay attention to selectors. There are many ways to select elements, which means you can be really expressive. You can be targeted when you to need to be, or you can apply a single style to many different elements at once. As a quick intro, here are the three most common ways to identify elements:
- Tag name. A selector like
imgwill apply styles to all images on the page
img {
  border-width: 2px;
}#.
#banner {
  background-color: yellow;
}..
.one-third {
  width: 33.33%;
}
Of course, there are a lot of other things you can do, and it gets way more interesting when you start combining these
techniques to make longer, more specific selectors. For example div.test refers to any
<div> elements with a test class. div.contents.special a:hover targets
links inside of divs that have both contents and special classes, but only when the cursor is
hovering over the link. You can really do all kinds of weird stuff with selectors.
Putting it Together
We’ve looked at some HTML tags and CSS styles, but let’s focus in on how they work together. This is key to understanding the Hot Page way of building web pages. Let’s say you’ve got an element in your code that looks like this:
<div class="test">Hello, world!</div>Elsewhere you might style it like this:
div.test {
  padding: 1rem;
  border: 2px dashed green;
  background-color: yellow;
}
And you’ll end up with this:
You can see that <div class=”test”> and div.test are really just two ways of saying same
thing. When we’re building a web site, we write elements and styles constantly, and it’s a little confusing to have to
switch back and forth between these two formats. The HTML style is real pain to type because it’s full of
brackets and quotes and stuff. So here on Hot Page we employ the CSS shorthand format in our body editor.
When making an element on Hot Page, you just write it like this:
We use this same convention for other attributes as well. For example, on Hot Page you can make an img element with an attribute written in CSS shorthand, like this:
And we’ll get this:

But where do styles live?
Finally, you’re probably wondering where the style rules actually live. It can get pretty complicated, because in theory you could sprinkle CSS all over the place. And when you think about it, there are plenty of opportunities for conflicting rules— that’s what the “cascade” part of “cascading style sheets” refers to. Luckily, Hot Page is organized so you shouldn’t have to think about this too much. However, you should be aware of the three basic ways of getting styles into a web document:
-
As an external document. This is great if you want to reuse a stylesheet on lots of pages. If you were
writing in a text editor, you might import an external stylesheet using a
<link>tag inside the <head> of an html document. Or, inside of another CSS document, you could use an “@import rule”— something like@import url('stylesheet.css');. We prefer the latter, and if you go to the Styles tab in the Hot Page editor, you’ll see there’s a button at the top for doing that. -
Internal, aka embedded styles. This is how you apply styles only to one page. In pure code, you’d do
this by writing style rules inside
<style>tags in your code. To make things easier on the eyes, Hot Page provides a designated area for CSS—that’s the Styles tab of the editor. -
Inline styles. You can also add styles to single elements, using a style attribute. In raw code, this
would look something like
<p style="color: red;">. In the Hot Page editor, this is separated out with other attributes on the right. [NOTE: OR RATHER, IT WILL BE SOON, AFTER THE NEXT UPDATE]
As we continue in this documentation, we’ll get into more detail about elements, selectors, properties and values. We’ll focus on the key ideas to keep in mind when working with these things. Since you can’t be expected to know every HTML element or CSS property by heart, we’ll also provide links to references where you can simply look that stuff up.
SECTIONS AFTER THIS

Honestly I think you can pretty much leave it as is. I cribbed from existing pages a bit, so you'd want to read thru it from top to bottom. The heading text for Elements probably changes. Pages vs sites can move to the Hot Page Editor section.